[Hi, everyone! I've been meaning to pull this project together for quite some time, but Peacepine prompted me to finally do it.

It's not posted complete yet, 'cause I don't have access to most of my crafting supplies at the moment. I'll also be posting a Clay doll tutorial (someday

)]
Materials:felt squares (2 fleshtone plus assorted colors)
thread (in matching colors)
fibrefill stuffing
craft glue (Tacky or Sobo)
acrylic paints
doll hair (can be synthetic/mohair/yarn etc.)
fabric scraps
embroidery floss
cotton swabpattern template (see attached file)
Pieces:
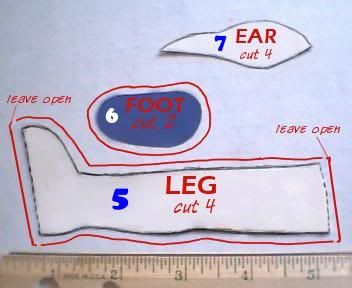
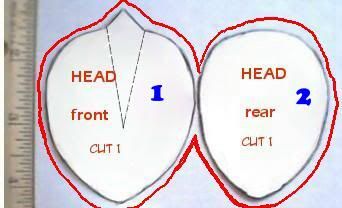
#1 - head (front) #6 - sole of foot
#2 - head (rear) #7 - ear
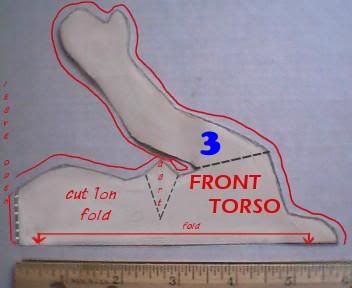
#3 - torso (front) #8 - eye
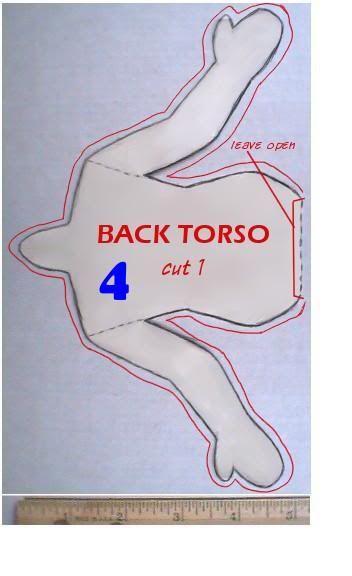
#4 - torso (rear) #9 - mouth
#5 - legTools:craft scissors
pencil or fabric marker
stuffing tool (small dowel/knitting needle etc.)
needles (hand sewing/chenille/doll or soft-sculpture - at least 4" in length)
paint brushA sewing machine isn’t absolutely necessary for this doll’s construction, but it will make your work go much faster than hand sewing! This tutorial also assumes you know a basic minimum about hand sewing (e.g. how to make a running stitch, wrong side and right side of fabric, etc.) If you don’t, this project might be a little too advanced for you. I’m sorry, but really don’t have the time nor the inclination to teach a Sewing 101 class.
 Steps:1)
 Take one square of fleshtone felt and trace pattern pieces #1, 2, 3, & 4 onto it with a pencil or fabric marker. Refer to the pattern layout for spacing. Fold the second square in half and trace pieces #5, 6, & 7 onto the doubled fabric. Piece #7 is traced twice because a double-thickness of fabric is needed for the ears. Copy the dotted lines on Pieces #1 & 3 to the felt. The traced lines will be the “wrong” side of the fabric.
 2)
2) Carefully cut out the felt pieces on the red outer lines (not the black and dotted ones). Lightly glue the first two ear pieces together, then the second pair, and set aside to dry.
 3)
3) With flesh-colored thread, sew a dart on the dotted line of Piece #1. Then sew the two darts in Piece #3. These darts give the doll’s head and body its rounded shaping.
 4)
4) Sew Pieces #1 & 2 together on the dotted line, keeping the darted side outward. Be sure to leave the top of the head unstitched so that you can turn the head right-side out and stuff with fiberfill.

[TBC]
 Author
Topic: EQ Plush Doll Tutorial (Read 5423 times)